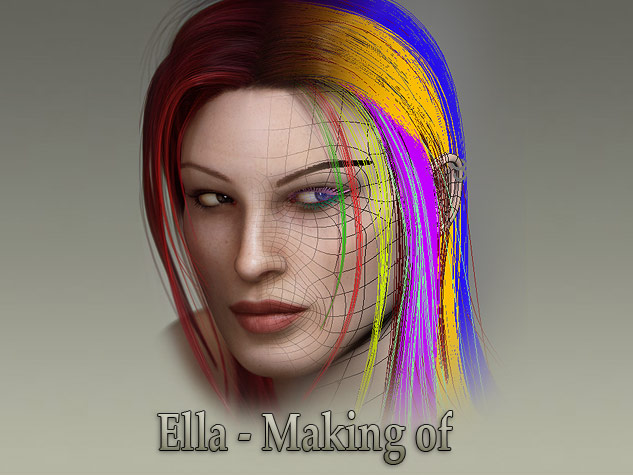
In this tutorial I will cover some of the interesting steps of this project.
I will cover modeling and rigging in general, texturing, working with complex hairs, rendering and compositing.
I will also
share a few tips and tricks as I show the process.
(click on the thumbnails to see the full chapter's images)
Modeling and rigging
The first step (as always) was to get a good reference. My friend Ella who is actually a model was kind enough to pose for me to get all the reference. I needed. Setting up good reference. for modeling (and for texturing later on) is an important step to do correctly. It is quite impossible to take a "perfect photo reference." because the camera will always have a certain perspective distortion. Also, the front and side images can never align perfectly so I did my best to set them up correctly based on elements like the eyes, nose, lips, and ears. for these reasons, these images only served as guidelines while modeling.
Even though this project is about a head portrait, I've decided to go all the way and make a full body first to save work for my next projects. To maximize my flexibility for later on, I've went ahead and made a quick rig for the model. I've used Biped for bones and did a quick skinning (its not perfect but It's good enough for initial posing, I'll probably use Zbrush to fix badly deformed areas). I've went ahead and created several morph targets to help me find my final expression quickly later on. Since the eyebrows and eyelashes were modeled separately, I found it very frustrating to get them to move correctly with the skin. The only solution that worked well for me was to break them into small groups and attach to.
texturing
Uv mapping actually came before rigging. When I've reached the point I've decided the modeling is done, I've unwrapped the model before breaking the symmetry so that I only worked on half the model and this way I'll get pretty symmetrical mapping as well. I've used Pelt to determine where the seams will go and together with a little bit of relaxing and hand pulling of a few UV points, the uv chunks were perfectly ready with only a few very minor stretches. After the initial mapping was good enough, I broke the symmetry and went on to arrange the UV pieces as efficiently as possible. Since fine details on the face are more important, I've decided to break the head from the body and give it much more UV space.
After making sure i've minimized the Stretches., had as few seams as possible and used up as much of the uv space as I can without having any overlaps I've decided its time to start painting the textures.
I started off by sampling many of the elements from the many reference. pictures I first used for modeling, I've then sort of "flattened" the image, took out the contrast and minimized the highlights and shadows, this gave me a rough initial background for the textures. Next step would be to paint the "shades" - where the skin is generally brighter, darker, redder etc'. At this point it was time for me to start working on the finer details. a method I've used allot for this was to create many different pattern layers for freckles, spots, veins and other skin abnormalities, add a black mask to delete it and then slowly bring it back manually with low opacity white brush strokes.
To create bump and specular maps I simply desaturated all the color map layers and changed their value and contrast accordingly, only minor local painting was required afterwards.
Hair
When I Started working on the hairs I've approached it as I always do. The first step was to clone the polygons that will grow hairs from the head to a new unrenderable mesh. I then added hairs and started combing and testing many different possibilities. A few pointers when working with max's hair: variation - this is the key to make your hair look interesting. Always try to test out how much you can push parameters that will create variations in your hair such as: rand scale, hue / value variation, frizz tip, randomize etc'.
Passes - it is often recommended to test how your hair looks when more than one pass is used. The higher the parameter, the softer the hair will render. Multi strand parameters - Hair often tends to clamp up and this feature simulates it nicely. I usually turn it on with root slay having a larger parameter than tip slay. Lights and shadows of your scene will make all the difference about how your hair's gonna render. usually using spotlights with shadow maps are ideal for hairs.
An important decision that always needs to be made when working with hairs is if you want to render the hairs at buffer or MR prim mode. buffer usually renders faster and looks softer but MR prim works well with many different light and shadow types.
At a certain point I was struck with frustration when I realized that this method is good but it doesn't allow me full freedom and control to design the hair specifically as I want. That's when I came to realize I can work with many smaller groups of hairs instead and control them by splines. I started up by creating 1 spline which acts like the profile of the hair's shape and cloned it twice to 3 different elements that will control the hair. I've added hairs and pretty much used similar parameters as before. Shaping the hair to specific shapes was easy this way. I've clone the hair pieces many times to smaller and larger parts and re-adjusted every piece until I was happy with how it turned out.
For extra touches, I've added a few more groups for random single hairs to give it a little more "natural messy" feel.
Rendering and compositing.
The image was basically done with the hit of the render button but rendering many different passes allowed me some more fine tuning which was necessary mostly for high res details.
I've rendered many different passes and used masks in photoshop to determine where and how much each pass is used.
A
few pointers about some of them - Specular -
I've rendered this pass by turning off all the color maps and setting the diffuse to black (yep, using the built in pass rendering doesn't seam to like working with the SSS materials) I used this pass to control the level of highlights at different parts of the image. Falloff - Rendered the same way, only specular was turned off and I threw a falloff map in the reflection slot. This pass served to fake the "peach fuzz" effect at certain edges. When used correctly, it slightly gives an "oily" feeling to the skin. Hair -
I've rendered out each and every piece of hair separately so that I'll have very good control over the colors of the hair in photoshop. Occlusion pass - this pass helped a bit to add more depth to the geometry. I wrote a tutorial on how I use it. Hair occlusion - Same as above. In order for the hair to render out correctly in the occlusion pass, you need to select your hair, under the "MR parameters" turn on "apply mr shader" and place your occlusion material there (you need to be in MR prim mode). Peach fuzz - This pass was rendered out for extra skin details that mainly show in the full resolution. I used a mask to make it show up only in areas it usually shows up like on the the lip or the chin.
That's it, after combining all the passes together, I went through some color correcting and some local fine tuning and this is the result (50% resolution).
I hope this was informative and interesting for you.